Tasks
Steps
Salutations
Navigation Path
Admin > Company Setup > Salutations
Notes
- BuildTopia has provided a list of 5 common salutations. These system defined salutations are not available for deletion. (Dr., Hn.,Miss, Mr., Mrs., Ms.)
To Add a Salutation
- Enter Salutation text field.
- Select the Add button to add the salutation.
To Edit a Salutation
- Select the Edit link from the Action column.
- Use the New Salutation text field to edit the salutation.
- Click the Save button.
To Remove a Salutation
If a salutation has been used is a prospect / buyer / owner record, it is not available to be deleted. The Delete link will be inactive.
If a salutation has not been used, it may be deleted.
- As appropriate, select the Hide or Delete link from the Action column. If the salutation has been hidden, the Hide link will be replaced with a Show link.
Sales
Navigation Path
Admin > Company Setup > Sales
Sales functions managed at the Admin level include Campaigns, Prospect Type Codes, Survey questions, and NSO settings.
Notes
- Sales Settings are available to BT Builder, BT Sales and BTLead customers only.
- Sales Settings define the company's default opt out rule and sales rep ability to update the buyer data, the ability of the user to require a note when Sales Rep dismisses a To Do task as well as the ability to restrict campaign list to prospect type codes in the project
Sales Settings
- Opt Out Rule - Select the Delete (default), Dismiss, or No Opt Out radio button to . Opt Out Rule selections determine how tasks are handled when a prospect / buyer / owner has selected to "opt-out" of contact through the contact method specified for the task. Opt-out rules are applied to campaign tasks.
- Delete - deletes the task without presenting to Sales staff and does not appear in the tally of tasks completed / dismissed in the SM > Follow-up screen. This is the default selection.
- Dismiss - dismisses the task without presenting to Sales staff, but the task is included in the tally of tasks in the SM > Follow-up screen.
- No opt Out - takes no action; the task is presented to Sales staff as usual.
- Allow SR to edit buyer information - Select the Yes (default) or No radio button
- Yes - Allows users with Sales Rep write permission to edit the buyer information.
- No - Users with Sales Rep write permission can not edit buyer information.
- Require a comment when Dismissing Tasks - Select Yes or No button to require a note when Sales Rep dismisses a To Do task.
- Restrict Campaigns - Select the Yes or No button to restrict the campaign list to prospect type codes. Selecting Yes is functionality designed for users whose Campaigns are completely separate from project to project, and who do not want Sales Reps to be able to view campaigns active in other projects other than their associated project.
- Yes:
- Campaigns shown within SR > Prospects > Tasks > Add Campaign will be only those campaigns associated to the Project - Prospect Type Code relationship.
- Campaigns shown in On Demand reports when generating campaigns will be only those campaigns associated to the Project - Prospect Type Code relationship.
- No: Default campaign functionality displays all campaigns regardless of association to Project - Prospect Type Code.
- Yes:
Recommended Practice: If this setting is selected and the user wishes to use Marketing Campaigns (see Campaign Management for a discussion on marketing campaigns and their use), BuildTopia recommends you set up a 'dummy' Prospect Type Code, keyed to marketing campaigns only. Do NOT use this type code to assign to prospects, but to identify marketing campaigns only.
- Select the Save button to save the changes.
NOTE: Any changes made to the opt out rule setting will update future prospect tasks. Changes to the opt out rule setting will not affect existing prospect tasks.
Prospect Type Codes
Navigation Path
Admin > Co Setup > Sales > Prospect Type Codes
Notes
- Managed at the Admin level, a single Prospect Type Code can be used in one or multiple projects. This provides you with flexibility to manage your campaigns on a per project basis. You're 1-A lead in Project 1, might need a different campaign then your 1-A lead in Project 2. If not, you will associate all projects to all prospect type codes.
- When a new prospect type code is created:
- It must be associated to a Project, creating a Prospect Type Code - Project association.
- Then Campaigns can be associated to the Prospect Type Code - Project association.
- When the type code is added to a Prospect, campaign tasks are automatically applied to that Prospect. (Campaigns added by this method are by their nature Follow Up Campaigns, with tasks assigned to Prospects in the SR module.)
- A Prospect Type Code cannot be deleted if it has been associated to a project, a prospect, or a campaign added.
- There are two system default Prospect Type Codes, which cannot be removed
or edited:
- Unassigned: this is the default type code for added Prospects. Campaigns can be added to this type code and tasks assigned.
- All Prospects: this type code cannot be applied to Prospects. It is used to create campaigns that apply to all Prospect Type Codes.
Steps - Add/Edit a prospect Type Code
- Select Add A Prospect Type Code, or Edit for an existing prospect type code
- Enter the Prospect Type - this is an alphanumeric field
- Enter in a description that defines the parameters of the prospect type
- Select Save
Steps - Delete Prospect Code
Note: You can not delete a prospect type code if the code is in use by prospects OR associated to projects
- See "Steps - Remove Project & Campaign Associations"
- Select Delete for a prospect type code
Steps - Create Project Associations
To view campaigns already associated to a project, select ![]()
- Select Project & Campaign Associations for a prospect type code
- To Associate a project to a prospect type code - select Associate Project(s)
- Select one or more projects
- Select the Associate Selected Project(s) button
Steps - Create Campaign Associations
Note: You must create the Project/Prospect Association first AND define the campaign
- Select Project & Campaign Associations for a prospect type code
- Select Add Campaigns for each project
- Select one or many campaigns to associate to this project
- Select Associate Selected Campaign(s)
Steps - Remove Project & Campaign Associations
Note: You have to remove the campaigns prior to disassociating a prospect type code from a project
- Select Project & Campaign Associations for a prospect type code
- Confirm that there are no campaigns associated by selecting

- Remove any associated campaigns by selecting the Remove link
- Select the Remove link for a project
Campaigns
Admin > Company Setup > Campaigns
Suggested Reading for further understanding of campaigns See "Best Practice: Follow Up Campaigns (with Document Templates)"
All campaigns are managed at the company level and are distinguished by the method of generating the campaign:
- Marketing Campaigns are designed to address single or multiple groups of entities: prospects, buyers, broker agents, or mortgage companies. A Marketing Campaign can be directed to any number of these entities across multiple projects and prospect code types, regardless of other associations the entities might have.
- Follow Up Campaigns are differentiated from Marketing Campaigns by the method of launching them, but otherwise any campaign can be used for follow up tasks or for marketing tasks.
Campaign fields can be edited to include campaign name, description, prospect type code and status [active or archived].
Independent from the prospect type code - project association, Marketing Campaigns can be launched across projects or prospect types. Tasks from Marketing Campaigns created at the report results screen are applied to the entities in the report. The data can also be exported to a Third Party Lead Management Tool which integrates with .CSV formatted files.
Steps - Add Campaign
- Select Add A Campaign
- Provide a Campaign name; e.g. "01-A - Campaign A The Deal"
- Provide a description of the purpose of the campaign; e.g. "for the 01 - A Prospect"
- Select the status of the campaign
- The active status will make this campaign available for use
- The archived status will discontinue the use of this campaign
Steps - Add Campaign Tasks
- Select Add Tasks for any given campaign
- Select Add A Campaign Task
- Enter the task name and description
- Select the Task Type
- Email - will prompt you to select an email template
- Email (Auto Send) - will prompt you to select an email template. This task is automatically sent by the system. The user is not required to take any action on this task type.
- Letter - will prompt you to select a letter template
- Meeting
- Other
- Phone Call
- Select the default days. This will calculate the date of the task based on the date the prospect was added, or the prospect type code was modified.
Company Questions
Admin > Company Setup > Company Questions
The user has the ability to setup Company level survey questions at the Company Setup screen. You have the option to add, edit, order, and delete. Company level questions are the first questions displayed in every project survey, and cannot be modified at the project level. Company level questions also apply to the WIK prospect import form.
Additionally, project level questions are managed in Admin > Projects, and apply to Surveys on a project-level basis only.
See "Manage Surveys" for step by step instructions on creating Company Questions.
NSO Settings
Navigation Path
Admin > Company Setup > Sales > NSO Settings
Notes
NSO Settings define the company's process for creating and managing custom option requests. The General settings specify when an NSO can be submitted for approval, when the NSO is released to purchasing, if the Estimate Budget is visible to trade partners, and when the price of the NSO is added to the total price of the Purchase Agreement (PA). The workflow settings allow the company to specify their NSO workflow.
- NSO Settings are available to BT Builder and BT Sales customers only.
Setting NSO Settings - General Settings
|
Allow NSOs to be Submitted Against Workups? |
The default setting of No prevents the user from submitting NSOs against workups. The user will be able to create an NSO, but will be unable to submit the NSO for further processing until the workup has been submitted. The user should select Yes when the user wants the ability to submit against workups as though the NSO was submitted against a submitted (sales) agreement.
- Select the Yes or No (default) radio button
- Yes - NSO can be submitted on a workup.
- No - NSO can only be submitted on an submitted sales agreement.
|
Buyer Acceptance immediately releases the NSO to Purchasing? |
If set to Yes, once the buyer has accepted the NSO, it will be automatically released to purchasing, and provided the lot schedule has been applied and approved, will be available for purchase order generation.
- Select the Yes or No (default) radio button
- Yes - The NSO will be automatically released to purchasing and available for purchase order generation.
- No - The NSO will manually be released to purchasing to generate purchase orders.
Allow Trade Partners to see Estimate Budget Information? |
The default setting of No prevents the trade partner from viewing the Budget Amount entered for each cost code in the estimate. Changing this setting to Yes will display the Budget Amount field in the Trade Partner's Quote. When an NSO is added to the activity list, the budget amount is added to the original and current budgets.
NOTE: This setting applies to BTBuilder only.
- Select theYes or No (default) radio button
- Yes - Allow the Company's Estimate Budget to be visible to online trade partners.
- No - The Company's Estimate Budget is not visible to the online trade partner.
NSO Status that adds NSO to PA |
- Select the status when the price of the NSO is added to the Total Price of the Purchase Agreement
- Buyer Accepted - When the Buyer Accepts the NSO, the total price of the purchase agreement will reflect the price of the NSO.
- Released - When the NSO is released to purchasing, the total price of the purchase agreement will reflect the price of the NSO.
Setting NSO Settings - Workflow Settings
- Allow Sales to Approve NSO without Production Acceptance - Allows the production approval step to be bypassed, allowing estimate creation and additional NSO processing without Production approval. The link for Production Acceptance is still displayed and may be utilized, but is not required to complete the NSO process.
- Allow Sales to Approve NSO with Production Acceptance but without a Completed Estimate - Sales must approve the NSO, followed by Production approval. The estimate with this setting is optional. The user may choose this setting if their business practice does not utilize estimates for NSOs.
- Allow Sales to Approve NSO with Production Acceptance and require a Completed Estimate - Production approval and the completed estimate are required to complete the NSO process.
- Select the Save button to save the changes.
NOTE: Any changes made to the NSO settings will update future NSOs. Changes to the NSO settings will not affect existing NSOs.
Document Settings
Navigation Path
Admin > Company Setup > Document Settings
Notes
The Document Settings screen allows the company to see their current usage, set the number of revisions to maintain and the default document settings for trade partners.
Setting Document Settings
- Select the number of revisions to a document to be stored in the system in the Keep X Revisions. The system allows up to 5 revisions of each uploaded document.
- Select the trade partner default role for documents accessible to trade partners in the Default Permission. This role is established is Admin > Company Setup > TP Document Roles. Learn more about defining trade partner roles here.
- Select the default document status for new documents added to Document Management in the Default Setting. This will determine the default status for trade partners accessibility to documents. The status can be changed on a document by document basis.
- Hidden - Document added will be hidden from online trade partners
- View - Document added will be visible for online trade partners.
- Edit - Document added will be visible and editable for online trade partners. The trade partner will have a Replace hyperlink that allows them to upload a new document.
- Select the Save button to save the changes.
NOTE: Any changes made to the Document settings will update future documents. Changes to the Document settings will not affect existing documents.
Document Folders
Navigation Path
Admin > Company Setup > Document Folders
Notes
Each document in BuildTopia will now be associated with a document folder.
There are 2 system defined folders in the system:
- General Access Folder - All users will have access to documents in this folder. This is also the default folder when uploading a document.
- Personal Folder - Only the user of the account has access to documents in this folder.
A company will be able to add up to 100 additional folders (i.e. lots, prospects, options, bids, etc.). Utilize folders to control permissions.
In the Document Roles settings the user can assign different permission levels such as None, View, Add, Edit, and Admin to control the access to the documents within each folder.
Add Document Folders
- Select Add Folder link.
- Enter the Folder Name in the text box.
- Select Status of Document Folder
- Active - Documents can be filed into the Folder.
- Archived - Documents can not be filed in the Folder.
- Select the Save button to save the changes.
Report Settings & Print Form Settings
Navigation Path
Admin > Company Setup > Report Settings or Print Form Settings
Notes
The user with administrative permission to edit Company Setup General settings can now control which Standard Reports and Print Forms are displayed in the application:
- In Admin > Company Setup > Report Settings, the user can sort by Data Type Folder to archive or unarchive individual Standard Reports. Archived reports do not display for selection from the Data Type Folder in Reports module.
- In Admin > Company Setup > Print Form Settings, the user can sort by Print Form Type [PO, for example] and archive or unarchive individual Print Forms. Archived forms do not display for selection when users hover over the printer icon in affected screens.
Data Upload
Navigation Path
Admin > Company Setup > Data Upload Wizard
Notes
The Data Upload wizard is the centralized location for the company to upload data into the application. Data Upload templates include explicit instructions which must be followed for your upload to be successful.
Templates are available for uploading the following data:
- Trade Partners
- Option Categories
- Activity Codes
- Cost Codes
- Option Codes
- Lots
- Schedule Templates
- Broker Agents
- Mortgage Companies
- Prospects
The data imports wizard reads hidden and visible columns. If you don't want to include a column in your data, you need to delete the column from the excel spreadsheet before attempting to import the records.
BuildTopia does not support files saved as Excel 2007 files or with an extension of .docx. If using Excel 2007 the user should save the document as an Excel 2003 document for data upload purposes.
Do not enter Dates into the Data Upload Wizard Excel file [dates are stored as serial numbers and BuildTopia does not recognize them]. The Wizard will not populate this field. User must enter or update each date field after upload is successful at the individual record.
Data Upload Steps
- Choose the Upload type.
- Download the Instruction Manual/Template if you have not done so already.
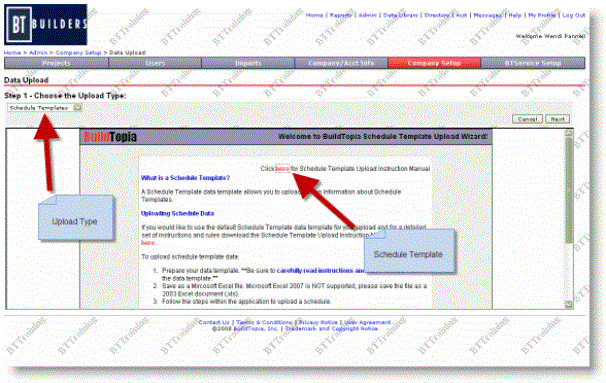
- Select the Next button
- Chose the columns to be imported.
- Select the Next button
- Select the order of the Columns
- Select the Next button
- Select the file with the data.
- Select the worksheet number in the Sheet Number field. The default is 1.
- Enter the row that the data starts on in the First Row Number field.
- Select the Next button.
Manage Lot Custom Fields
Navigation Path
Data Library > Company Setup > Lot Custom Fields
Notes
- There are 20 custom lot fields already created. There are 5 date fields, 5 drop down fields, 5 long text fields and 5 number fields. All you need to do is activate and customize each field. These fields will appear in all projects.
- The long text fields allow a maximum of 4000 characters.
- Custom fields do not show up to Trade Partners
Steps
- Select the type of field that you want to customize, e.g. Date or Drop Down.
- Select Define or Edit under the Actions column
- Enter the Lot Custom Field Name to describe the information required
- Edit the Status field as appropriate.
- Active is selected by default. Active means that this custom field will be available for data input.
- Required can be used if you want to make this field required. If you make a new field required, next time you edit an existing lot you will be required to enter the field information prior to saving.
- If you are not ready to make this field active, select Archived. Archived can also be used to 'retire' fields that are no longer needed.
Note
Once you have begun to capture information in these fields, you want to consider the impact of changing the Field Name. The information captured prior to changing the Field Name might not match the information you are seeking in the new field.